CRUD Operation in ASP.NET Core MVC Using Visual Studio and ADO.NET
 |
Vivek Jaiswal |
19394 |
{{e.like}} |
{{e.dislike}} |
In this ASP.NET Core article, we are going explain how to perform CRUD operation in ASP.NET Core MVC with ADO.NET and Visual Studio from the beginning. Here we will creating simple web application from scratch for demonstrating CRUD operation in ASP.NET Core with ADO.NET.
Perquisites:
Download .NET Core 2.0 or above SDK from here
Download visual studio 2017 or above from here
Follow the below steps to perform CRUD operation in ASP.NET Core.
Step1. Open SQL Server and create a database and following table.
CREATE TABLE dbo.tbl_Employee
(
Sr_no int  IDENTITY(1, 1),
Emp_name nvarchar(200)   ,
City nvarchar(200)   ,
State nvarchar(200)   ,
Country nvarchar(200)   ,
Department nvarchar(200)
)
Step2. Now we will create stored procedures for INSERT, UPDATE, DELETE and view record.
CREATE PROC Sp_Employee
@Sr_no int ,
@Emp_name nvarchar(500),
@City nvarchar(500),
@STATE nvarchar(500),
@Country nvarchar(500),
@Department nvarchar(500),
@flag nvarchar(50)
AS
 begin
 IF(@flag='insert')
 BEGIN
 INSERT INTO dbo.tbl_Employee
 (
     Emp_name,
     City,
     State,
     Country,
     Department
 )
 VALUES
 (   @Emp_name,
     @City,
     @State,
     @Country,
     @Department
     )
 end
 ELSE IF(@flag='update')
 BEGIN
   UPDATE dbo.tbl_Employee SET
    Emp_name=@Emp_name,City=@City,State=@STATE,Country=@Country,Department=@Department
 WHERE Sr_no=@Sr_no
 END
  ELSE IF(@flag='delete')
 BEGIN
   DELETE FROM tbl_Employee  WHERE Sr_no=@Sr_no
 END
  ELSE IF(@flag='getid')
 BEGIN
   SELECT * FROM tbl_Employee WHERE Sr_no=@Sr_no
 END
 ELSE IF(@flag='get')
 BEGIN
   SELECT * FROM tbl_Employee
 end
 END
Now, our database part has been completed. So we will proceed to create ASP.NET Code application using Visual Studio 2017.
Step3. We will be creating the web application in ASP.NET CORE MVC.
Open Visual Studio 2017 》New 》 ASP.NET Core Web Application 》 MVC
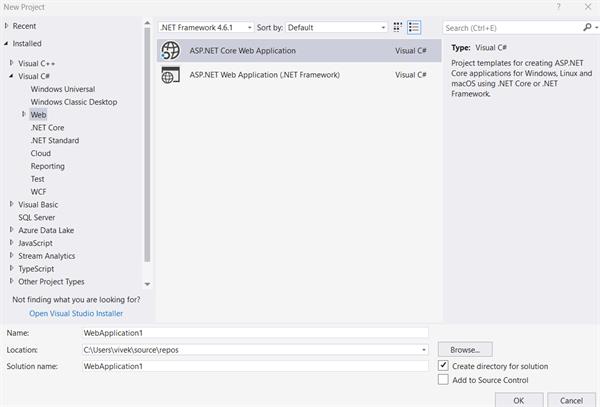
Step4: Here we will use ADO.NET for database related operation, so we need to create db class for performing all operations.
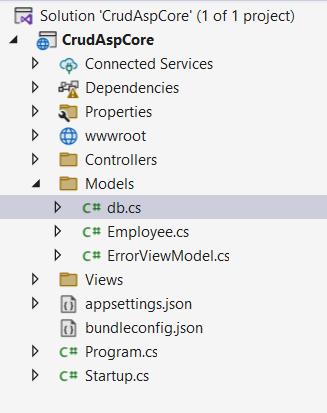
Step5: Write the following code snippet into db.cs for performing CRUD operations.
using System;
using System.Collections.Generic;
using System.Linq;
using System.Threading.Tasks;
using System.Data;
using System.Data.SqlClient;
using CrudAspCore.Models;

namespace CrudAspCore.Models
{
    public class db
    {
        SqlConnection con = new SqlConnection("Data Source=ADMINRG-N8EO0RN\\SQLEXPRESS;Initial Catalog=testdb;Integrated Security=True");

        // For View record
        public DataSet Empget(Employee emp, out string msg)
        {
            DataSet ds = new DataSet();
            msg = "";
            try
            {
                SqlCommand com = new SqlCommand("Sp_Employee", con);
                com.CommandType = CommandType.StoredProcedure;
                com.Parameters.AddWithValue("@Sr_no", emp.Sr_no);
                com.Parameters.AddWithValue("@Emp_name", emp.Emp_name);
                com.Parameters.AddWithValue("@City", emp.City);
                com.Parameters.AddWithValue("@STATE", emp.State);
                com.Parameters.AddWithValue("@Country", emp.Country);
                com.Parameters.AddWithValue("@Department", emp.Department);
                com.Parameters.AddWithValue("@flag", emp.flag);
                SqlDataAdapter da = new SqlDataAdapter(com);
                da.Fill(ds);
                msg = "OK";
                return ds;
            }
            catch (Exception ex)
            {
                msg = ex.Message;
                return ds;
            }
        }

        //For insert and update
        public string Empdml(Employee emp, out string msg)
        {
            msg = "";
            try
            {
                SqlCommand com = new SqlCommand("Sp_Employee", con);
                com.CommandType = CommandType.StoredProcedure;
                com.Parameters.AddWithValue("@Sr_no", emp.Sr_no);
                com.Parameters.AddWithValue("@Emp_name", emp.Emp_name);
                com.Parameters.AddWithValue("@City", emp.City);
                com.Parameters.AddWithValue("@STATE", emp.State);
                com.Parameters.AddWithValue("@Country", emp.Country);
                com.Parameters.AddWithValue("@Department", emp.Department);
                com.Parameters.AddWithValue("@flag", emp.flag);
                con.Open();
                com.ExecuteNonQuery();
                con.Close();
                msg = "OK";
                return msg;
            }
            catch (Exception ex)
            {
                if (con.State == ConnectionState.Open)
                {
                    con.Close();
                }
                msg = ex.Message;
                return msg;
            }
        }
    }
}
In the above code snippet Empget() return as Dataset on the basis of flag(get/getid), This method used for view all record and find the record by their id.
Empdml method used for insert and update record according to their flag (insert/update)
Step6: Now adding model to the project, name as Employee.cs.
Right-click the model folder and add the class name as Employee, this will add a file inside the model folder.
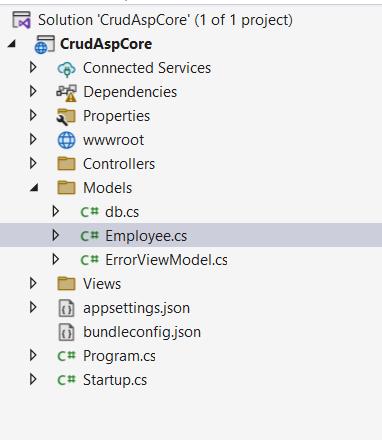
Add following code snippet inside to the Employee class.
using System;
using System.Collections.Generic;
using System.Linq;
using System.Threading.Tasks;
namespace CrudAspCore.Models
{
    public class Employee
    {
        public int Sr_no { get; set; } = 0;
        public string Emp_name { get; set; } = "";
        public string City { get; set; } = "";
        public string State { get; set; } = "";
        public string Country { get; set; } = "";
        public string Department { get; set; } = "";
        public string flag { get; set; } = "";
    }
}
In the above code, I have also provide default value for each property because if user does not provide the input then it will take their default value.
Step7: Adding Controller to the application:
Right-click on Controller folder and add controller class as HomeController.cs. It will create new file inside Controller folder. Here we will create all business logic.
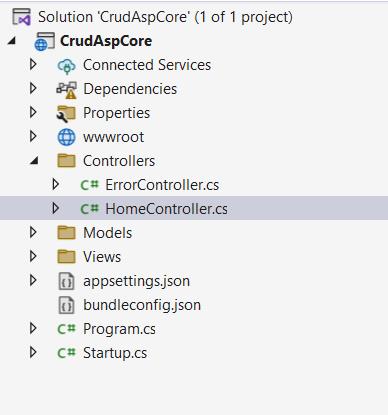
Step8: Add views to the application:
To add Views for controller class, we need to create folder inside Views folder with same name as Controller class (Here name as Home) and then add Views to that folder.
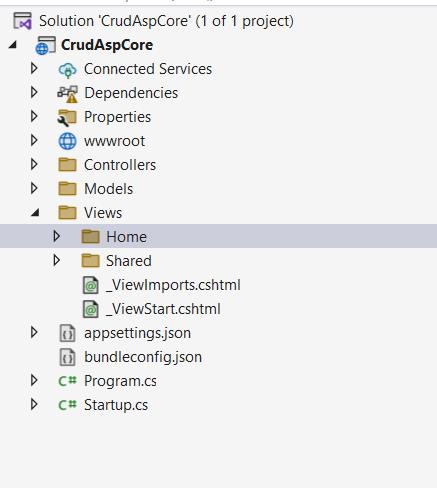
To add Views files, Right-click on Home folder inside Views folder and then select View name as Index.cshtml and also add two more Views name as Create.cshtml and Edit.cshtml
Our Views folder look like this.
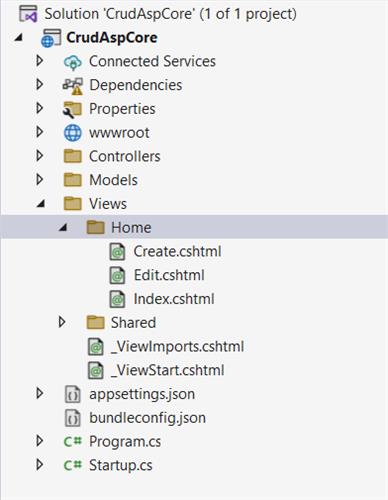
Step9: Index view: This view will display all employee records from database.
Open Index View and write the following code snippet.
@model IEnumerable<CrudAspCore.Models.Employee>
@{
    ViewData["Title"] = "Home Page";
}
<table class="table">
    <thead>
        <tr>
            <th>Sr No.</th>
            <th>Employee Name</th>
            <th>City</th>
            <th>State</th>
            <th>Country</th>
            <th>Department</th>
            <th>Actions</th>
        </tr>
    </thead>
    <tbody>
        @foreach (var item in Model)
        {
            <tr>
                <td>@item.Sr_no</td>
                <td>@item.Emp_name</td>
                <td>@item.City</td>
                <td>@item.State</td>
                <td>@item.Country</td>
                <td>@item.Department</td>
                <td>
                    <a asp-action="Edit" asp-route-id="@item.Sr_no">Edit</a>
                    <a asp-action="Delete" asp-route-id="@item.Sr_no">Delete</a>
                </td>
            </tr>
        }
    </tbody>
</table>
Open HomeController.cs file and write the following code snippet
using System;
using System.Collections.Generic;
using System.Diagnostics;
using System.Linq;
using System.Threading.Tasks;
using Microsoft.AspNetCore.Mvc;
using CrudAspCore.Models;
using System.Data;
using System.Data.SqlClient;
namespace CrudAspCore.Controllers
{
    public class HomeController : Controller
    {
        db dbop = new db();
        string msg;
        public IActionResult Index()
        {
            Employee emp = new Employee();
            emp.flag = "get";
            DataSet ds = dbop.Empget(emp,out msg);
            List<Employee> list = new List<Employee>();
            foreach (DataRow dr in ds.Tables[0].Rows)
            {
                list.Add(new Employee
                {
                    Sr_no=Convert.ToInt32(dr["Sr_no"]),
                    Emp_name=dr["Emp_name"].ToString(),
                    City = dr["City"].ToString(),
                    State = dr["State"].ToString(),
                    Country = dr["Country"].ToString(),
                    Department = dr["Department"].ToString()
                });
            }
            return View(list);
        }
    }
}
As we can see that we have created object of db class to handle the database operations.
In the above code, you can observe that Empget method return dataset and the convert this dataset into Employee type list format.
Create View: This view will be used to add new record for Employee into a database.
Open Create.cshtml and write the following code snippet
@model CrudAspCore.Models.Employee
@{
    ViewData["Title"] = "Create";
}
<form asp-action="Create" class="form-horizontal">
    <div class="form-group">
        <label class="control-label">Name</label>
        <input asp-for="Emp_name" class="form-control" />
    </div>
    <div class="form-group">
        <label class="control-label">City</label>
        <input asp-for="City" class="form-control" />
    </div>
    <div class="form-group">
        <label class="control-label">State</label>
        <input asp-for="State" class="form-control" />
    </div>
    <div class="form-group">
        <label class="control-label">Country</label>
        <input asp-for="Country" class="form-control" />
    </div>
    <div class="form-group">
        <label class="control-label">Department</label>
        <input asp-for="Department" class="form-control" />
    </div>
    <div class="form-group">
        <input type="submit" value="Submit" class="btn btn-primary" />
    </div>
</form>
For handling business logic, Open HomeController and write the following code snippet.
 public IActionResult Create()
{
  return View();
}
[HttpPost]
public IActionResult Create([Bind] Employee emp)
   {
     try
      {
        emp.flag = "insert";
        dbop.Empdml(emp, out msg);
        TempData["msg"] = msg;
       }
      catch (Exception ex)
       {
         empData["msg"] = ex.Message;
       }
       return RedirectToAction("Index");
}
In the above code snippet you can see that we have created two action methods for Create, One method for HttpGet and another for HttpPost. The HttpGet action method will display the form for user’s input and HttpPost handle the post request when user click on Save button after entering the record.
The [Bind] attribute is used with parameter Employee to protect against over-posting.
Edit View: This view will be used for update record for Employee into database.
Open Edit.cshtml and write the following code snippet.
@model CrudAspCore.Models.Employee
@{
    ViewData["Title"] = "Edit";
}
<form asp-action="Edit" class="form-horizontal">
    <div class="form-group">
        <label class="control-label">Name</label>
        <input asp-for="Emp_name" class="form-control" />
    </div>
    <div class="form-group">
        <label class="control-label">City</label>
        <input asp-for="City" class="form-control" />
    </div>
    <div class="form-group">
        <label class="control-label">State</label>
        <input asp-for="State" class="form-control" />
    </div>
    <div class="form-group">
        <label class="control-label">Country</label>
        <input asp-for="Country" class="form-control" />
    </div>
    <div class="form-group">
        <label class="control-label">Department</label>
        <input asp-for="Department" class="form-control" />
    </div>
    <div class="form-group">
        <input type="submit" value="Submit" class="btn btn-primary" />
    </div>
</form>
For handling business logic, Open HomeController and write the following code snippet.
        public IActionResult Edit(int id)
        {
            Employee emp = new Employee();
            emp.Sr_no = id;
            emp.flag = "getid";
            DataSet ds = dbop.Empget(emp, out msg);
            foreach (DataRow dr in ds.Tables[0].Rows)
            {
                emp.Sr_no = Convert.ToInt32(dr["Sr_no"]);
                emp.Emp_name = dr["Emp_name"].ToString();
                emp.City = dr["City"].ToString();
                emp.State = dr["State"].ToString();
                emp.Country = dr["Country"].ToString();
                emp.Department = dr["Department"].ToString();
            }
            return View(emp);
        }
        [HttpPost]
        public IActionResult Edit(int id, [Bind] Employee emp)
        {
            try
            {
                emp.Sr_no = id;
                emp.flag = "update";
                dbop.Empdml(emp, out msg);
                TempData["msg"] = msg;
            }
            catch (Exception ex)
            {
                TempData["msg"] = ex.Message;
            }
            return RedirectToAction("Index");
        }
Here we have created two method, one for fetching the record on the behalf of their id and other is update the record after posting the record.
Delete View, here we will delete the record on the behalf of their record id.
Open HomeController.cs and write the following code snippet into the Controller.
       public IActionResult Delete(int id)
        {
            try
            {
                Employee emp = new Employee();
                emp.flag = "delete";
                emp.Sr_no = id;
                dbop.Empdml(emp, out msg);
                TempData["msg"] = msg;
            }
            catch (Exception ex)
            {
                TempData["msg"] = ex.Message;
            }
            return RedirectToAction("Index");
        }
Now you can run the application.
Thanks for reading !
Also Read:
How to read Connection string from Appsetting.json in ASP.NET Core
Thanks.
If you like, please share with your friends.
Comments
|
|
|
| Follow up comments |
| {{e.Name}} {{e.Comments}} |
{{e.days}} | |
|
|
||
|
|
||
| {{r.Name}} {{r.Comments}} |
{{r.days}} | |
|
|
||


